
In this Article:
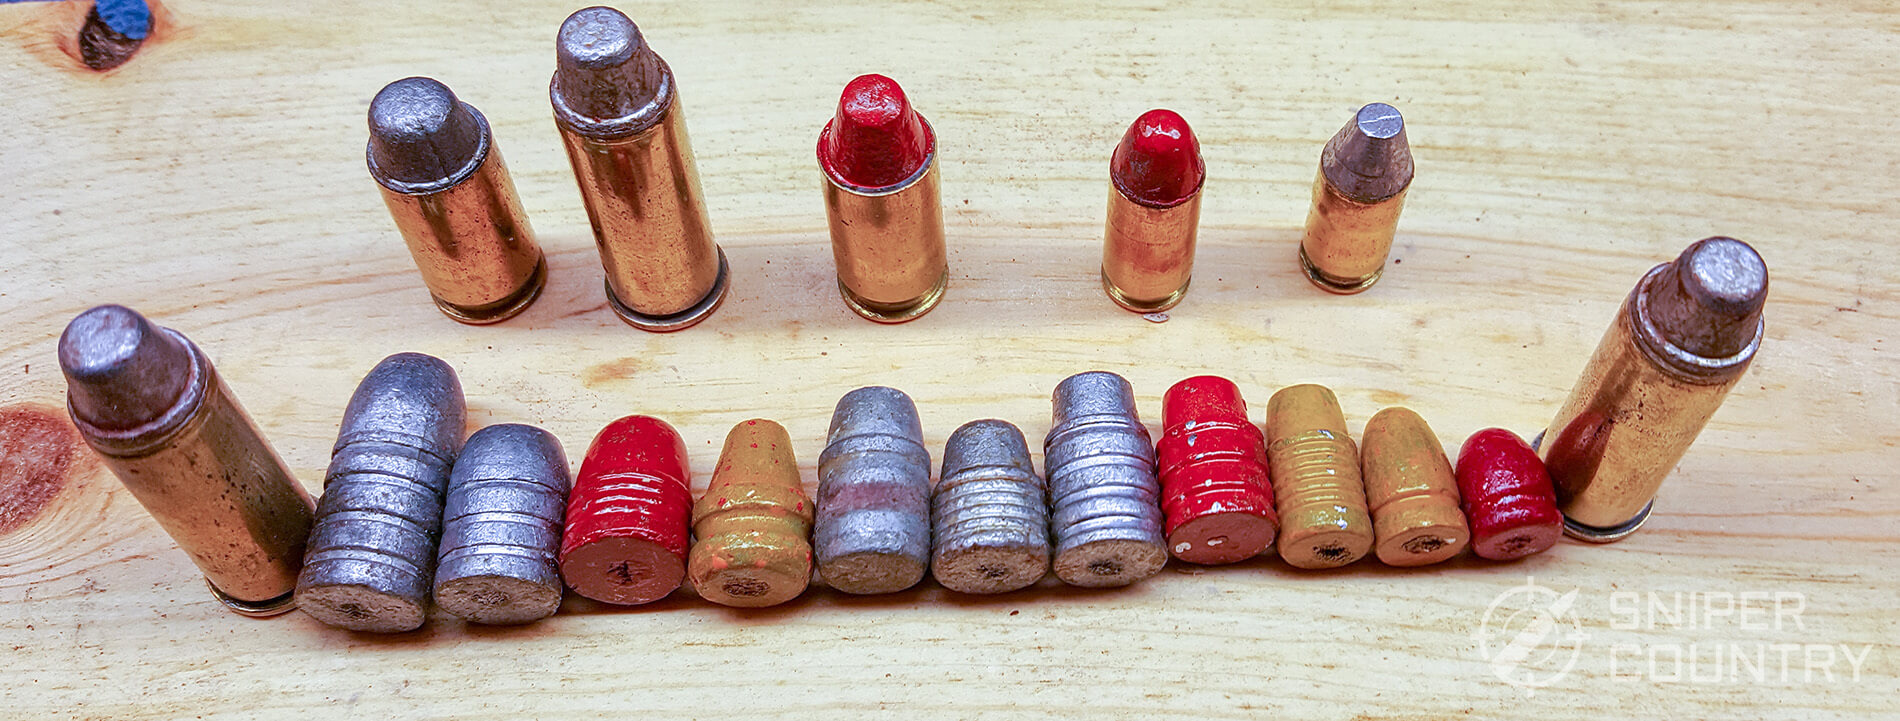
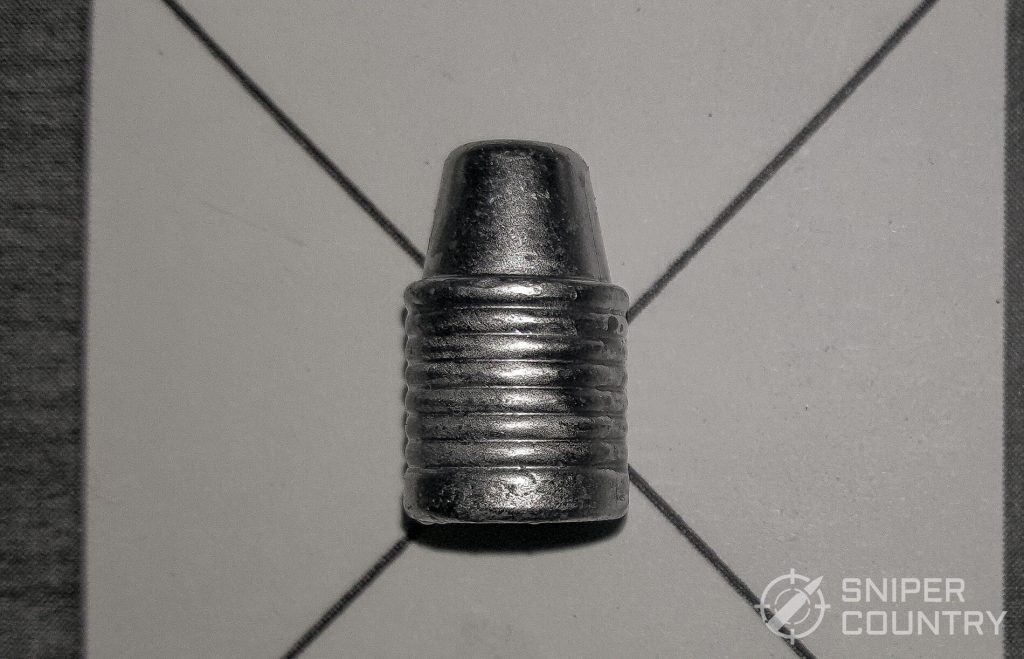
The sun was just beginning to peek over the tree line as one of my sons and I sat at the edge of a thicket, facing a large, unmowed meadow. It was November and deer firearms season. We watched a couple of nice does meander towards us across the meadow. We decided I would attempt to take the one on the left, if she came into range. I got my 8 3/8†barreled S&W model 629 ready. I could make her out over the iron sights. When she got a bit closer, I thumbed the hammer back, put the front sight on her shoulder and gently squeezed off the shot. She jumped, and ran off. She only made it about 25 yards before she went down. We waited a while, then walked up to her. The 260-grain semi-wadcutter bullet had impacted right where the front sight was placed, and had gone completely through her. She weighed about 140 pounds – a lot of meat for us and our local food pantry. The bullet that put her down had been cast by me in my garage not long before. It was the same bullet I had used for years for all sorts of hunting and target shooting.
I know that some of you are not hunters, but I wanted to start my discussion of cast bullets with something from my experience that demonstrates the usefulness of such bullets. Add in the fact that our local food pantry benefitted from our foray into the field and we have a situation that benefits several people, all because I turned a wheel weight or two into an accurate bullet.
I haven’t shot more than about 20 boxes of factory-loaded ammunition in the past 10 years or so, unless it was for a gun review. I can’t afford it, for the most part. I like to “roll my own†and shoot my own home-cast bullets. I’ve shot hundreds of them into the hills behind my house or while hunting. For the most part, they have done whatever job I’ve asked of them, at a fraction of the cost of jacketed bullets.
Love Ammo? Get My Cartridge Comparison Handbook!
Get my premium 550+ pages handbook that compares all cartridges, for free (worth $199!) only today !
Your e-mail address:
This e-mail address seems incorrect...
Success! Check your mailbox.
This e-mail address is already subscribed.
Loading ...

Rifle Vs. Handgun Cast Bullets
There isn’t much difference between making bullets for a rifle or a handgun. I’ve made both, but now pretty much exclusively cast handgun bullets. For a rifle, you usually pay a little more attention to casting bullets with precision, with bullet weight/diameter being king. It’s pretty much the same for handgun bullets, but they tend to be a bit more forgiving for the majority of their uses.
Before we get started: You alone are responsible for the safety of yourself and your property. Read our disclaimer here!
Why Cast Bullets?
I have a few reasons that I like to make my own bullets – I listed one of them above. But, cost aside, bullet casting is a hobby that goes along with my shooting and enables me to shoot more. Here are some reasons why I cast my own and also some uses that I find for them…
Save Money
I shoot mostly handguns, so if I were to buy jacketed or plated bullets for all the handgun calibers I load for, it would add up quickly. Here’s a quick example…a .45 ACP FMJ round-nose bullet, about as plain-jane as you can get in the world of .45 ACP bullets. This screenshot was taken from one of the more economical online bullet providers:
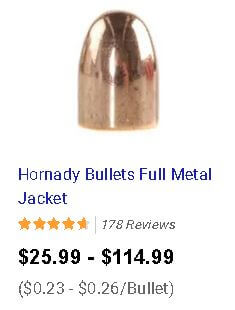
Even at 23¢ each, that’s about 4 times the cost of the same style and weight bullet that I can cast. And, they both will accurately hit the target and then be gone, so I’m out only about four cents rather than almost a quarter. This is just one example. JHP bullets tend to cost even more.
Versatility
When you cast your own bullets, you are free to make bullets for older or more obscure calibers where store-bought bullets may not be available. You are free to make bullets in weights or configurations for common calibers that may not be readily available where you live. You are free to make bullets that are just plain different than any other bullet you can find for a given caliber. Or, conversely, you can make bullets that “mimic†factory bullets in an effort to cut the cost down (#1 above) or to make them in an effort to be shot at a slightly lower pressure due to the cast properties of bullets versus jacketed ones.
Target Shooting
Cast bullet usage includes informal target shooting. I don’t know how many of my home-printed paper targets I’ve put holes in over the years. Another use is competition – I’m not really big into competing, but there are those who are and they practice and/or compete with cast bullets. One very famous example is Jerry Miculek. This S&W competitor has a few videos on You Tube of him melting alloy in a big container over a 20-gallon LP tank and burner and skimming off the dross. He must go through thousands of cast bullets every year.
Hunting
One of my favorite uses for my cast bullets is hunting. I tend to use mid-range loads, which are just as effective at the ranges I hunt as the barn-burner loads would be. I have actually used the same .44 Magnum mid-range load on squirrels and deer. I know what you’re thinking, especially if you’re a handgun hunter – ‘was the squirrel turned inside-out and skinned when that 260-grain bullet hit ‘im? HA!’ …actually, not. A hard-cast .44 bullet just makes a .429-caliber hole in the critter and there’s plenty left to use. The key here is “hard-cast the hard semi-wadcutter just passes through, where a jacketed hollow point might totally de-construct that squirrel. The effect is the same on deer – I’ve yet to recover one of my bullets from a downed deer. That hard bullet just smacks the deer and keeps on going. There is not a lot of tracking involved, usually. I can remember three specific instances where I’ve taken deer and the distances involved. All distances were measured. One doe was taken at 45 yards, with a shot behind the ear, from my tree stand. Another one was taken at 104 yards (as I said, measured). These critters fell to the .44 Magnum, with a 260-grain cast bullet right around 1100 fps. The third deer was taken with a .45 Colt 260-grain cast bullet at 95 yards. Both the latter two deer were taken from ground blinds. Now, I don’t mention these to “brag†about my hunting skills – I am not exactly Daniel Boone in that area – but to show the effectiveness of a simple, hard-cast semi-wadcutter at a reasonable velocity on medium-size game. What I am good at is practicing. Having a backyard range helps me keep my skills sharp before the season begins. I have since acquired a rangefinder and will limit my shot to 75 yards or so – I was estimating range before and was off a bit. If you are still in doubt about the effectiveness of hard-cast bullets on game, read Elmer Keith’s book “Sixguns†if you can find it. He was the dean of cast bullet usage and was the “father†of the .44 Magnum.
Hobby
…it’s fun! I have many bullet molds that I have used over the years. My hobby aspect of casting started right around 1979, when I obtained my Ruger Super Blackhawk .44 Magnum (and later my S&W Model 29, then 629) and I wanted to make my own bullets for that caliber. I started with two Lee single-cavity molds – I don’t think they even make singles any more. But, the molds still work all these years later. My hobby has lasted me from then until now and has produced thousands of bullets (I never kept records – too busy casting). I have put many hundreds of then into the hills around my targets here at home, into steel at competitions, or into game in the field across from our house. My hobby has not only saved me money, it’s allowed me to shoot many times more than I could have if I had been limited to factory bullets.
Experimentation
…this goes along with the Versatility aspect a bit. I have experimented with cast bullets I’ve made in calibers that you wouldn’t normally associate with each other. A couple of examples include a 124-grain 9mm bullet in .38 Special loads and a 200-grain .45 ACP semi-wadcutter in .45 Colt. Sure, I could have tried factory bullets here, but what if I need special bullet sizing not normally associated with that caliber? I could do that if needed.
When casting bullets, you have control over just about every aspect of the bullet’s construction. Bullet weight, diameter, nose configuration, driving band, lubrication…you get it. Casting your own allows you to be in control. Add in the ability to tailor the bullet to the task – making a few up to try – and you get the picture. Casting bullets has been a satisfying hobby for over 40 years, one which has a definite purpose and use. It makes a great accompaniment hobby to shooting. Let’s look at it some detail…first, the equipment and supplies you need and then the process of making bullets.
Bullet Casting Equipment
In order to make your own accurate bullets, you will need a few things. A minimal amount of equipment that would get you started would include:
- A source of suitable lead alloy
- At least one lead furnace
- Bullet mold(s)
- Bullet sizer (if needed – more on this later)
- Bullet lube of some sort
- A place to do it
There are always more things you could acquire along the way – bigger lead furnaces, thermometers, different bullet molds, etc. – but the above will get you in the game. Let’s take the above in the order they’re listed. I’ll explain as we go along.
Love Ammo? Get My Cartridge Comparison Handbook!
Get my premium 550+ pages handbook that compares all cartridges, for free (worth $199!) only today !
Your e-mail address:
This e-mail address seems incorrect...
Success! Check your mailbox.
This e-mail address is already subscribed.
Loading ...
Supplies Needed
You will need a supply of suitable lead alloy with which to make your bullets. I generally use wheel weights, as I have a supply of free weights from a couple of local tire shops. Let’s go ahead and talk about getting your alloy ready to cast and later we’ll see how to make bullets from it.
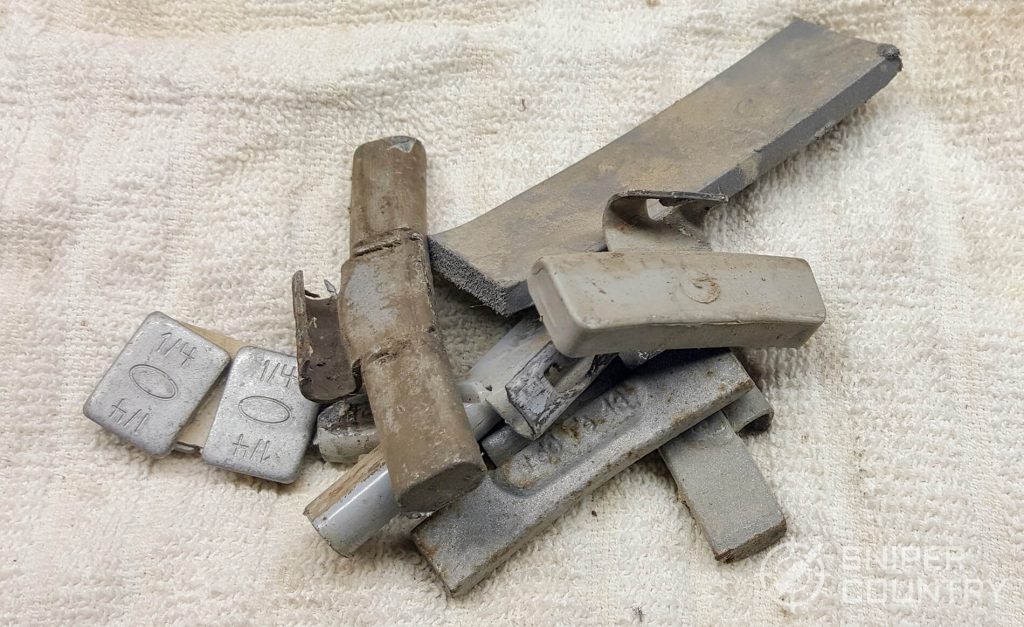
Here’s what decent, usable wheel weights should look like:
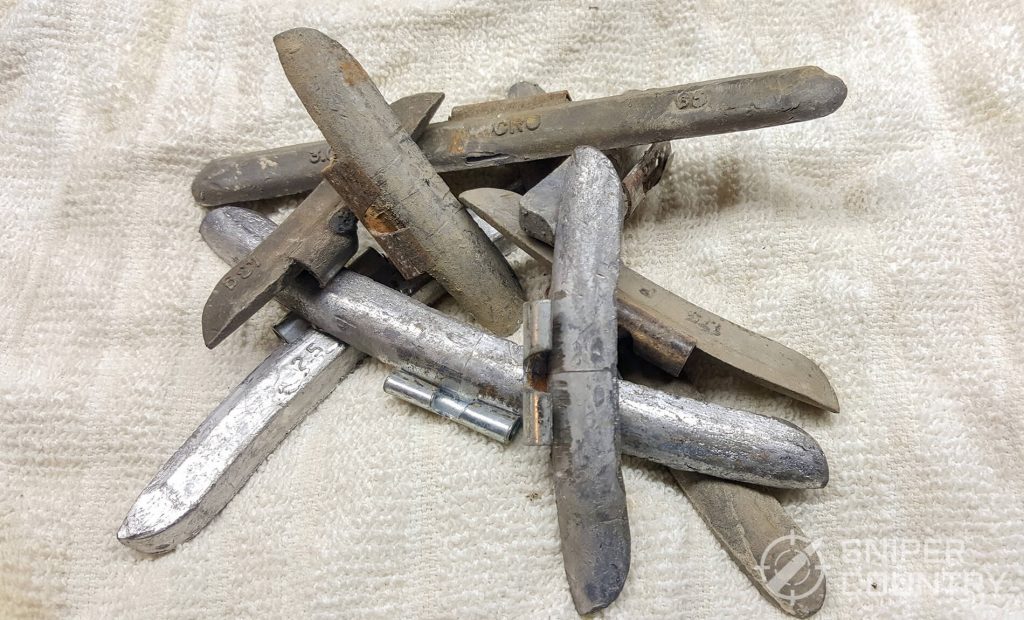
These weights are mostly lead, with a tiny amount of antimony and tin thrown in. In terms of hardness, they’re not very hard. On the Brinell scale, wheel weights may come in around 6-9 or so. Here’s a handy chart that helps explain metal hardness in terms of Saeco’s measurements and Brinell hardness BNH):
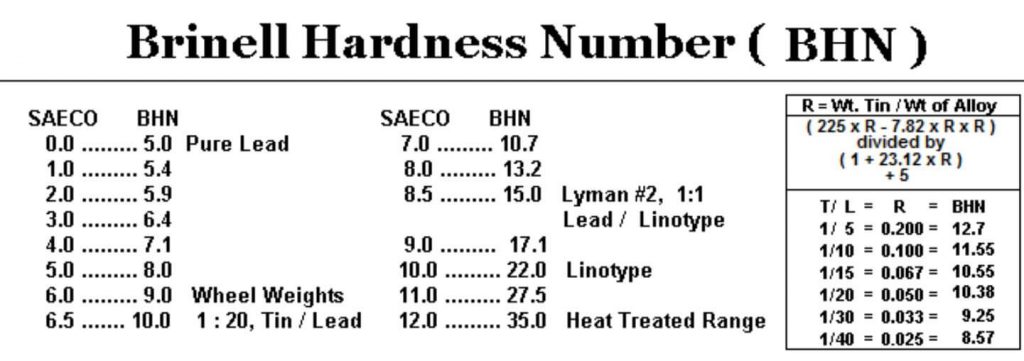
Why worry about hardness? Because, the harder the bullet the faster you can drive it without leading, other factors being right. (Sizing has at least as much impact on leading as alloy hardness… an undersized bullet can “skip“ down the bore, stripping lead as it goes). As we can see, wheel weights by themselves are not all that hard. Is there a way to make them harder? Sure. You can add linotype metal (not so common anymore in this age of digital printing) or a little tin. The proportions are given above on the right. Another way to add a small amount of harness is to drop the bullets from the bullet mold into cold water. Some guys use a 5-gallon bucket, but I’ve always had decent luck with a smaller container.
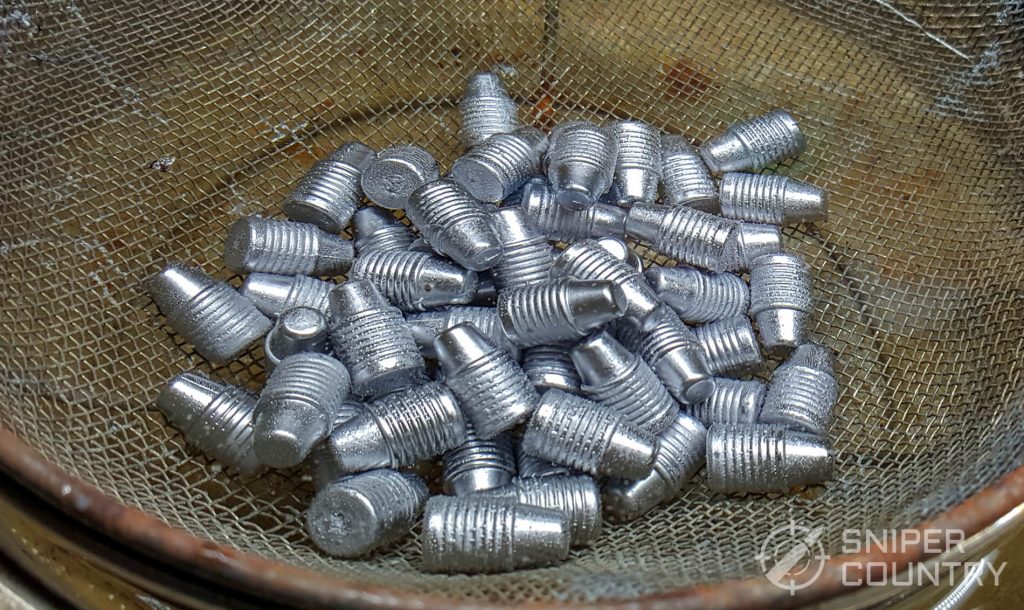
The bullets harden on impact with the water, being quenched to a slightly harder degree. There’s not much gain – maybe 1 or 2 on the Brinnell scale – but a little can help. I’ve used plain wheel weights for years and they’ve done everything I’ve needed them to. If you can get them, you might want to stockpile them as lead weights are being phased out for other wheel weight metal types, mostly iron, zinc and aluminum. Here’s what those weights look like:
You need to be able to tell them apart from lead weights, as a few zinc weights can just about ruin your lead furnace. If you see purple in your furnace, you’ve got zinc in it and you need to clean it really well. Non-lead weights are marked: “Fe†(iron), “Al†(aluminum) and “Zn†(zinc). So, if you didn’t flunk high school chemistry, you should be good to go.
I have a small amount of weights put away in my garage, in four 5-gallon buckets (for now….I’ll add to it a little later).
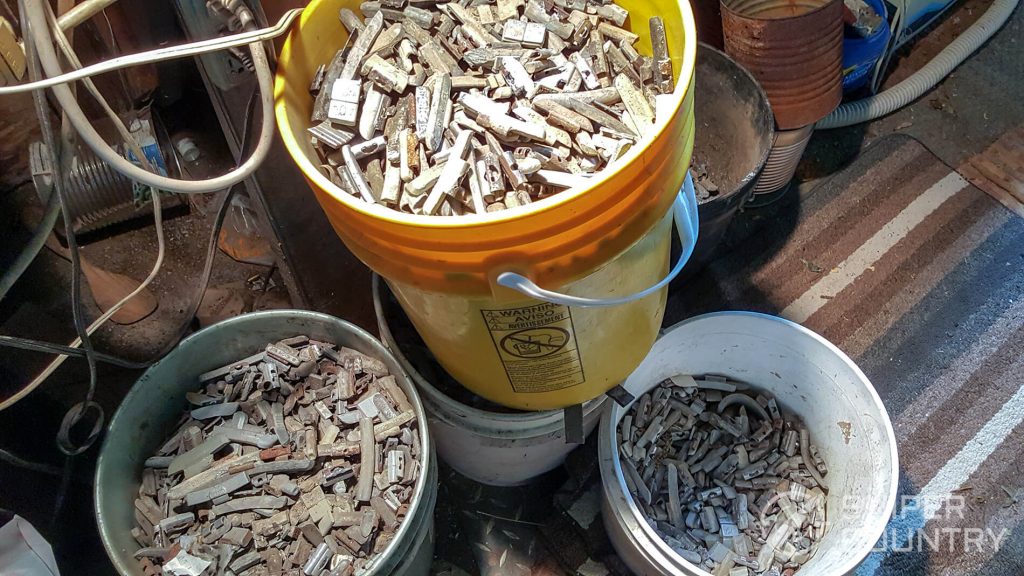
Some folks have over a ton of wheel weights put by, but this stash will last me a good while. I do need to cull the non-lead weights – haven’t done that yet.
Equipment Needed
Here’s a slightly more detailed listing of equipment than that above. In order to make bullets once you’ve got your lead, you’ll need:
- One or more lead furnaces
- Bullet molds
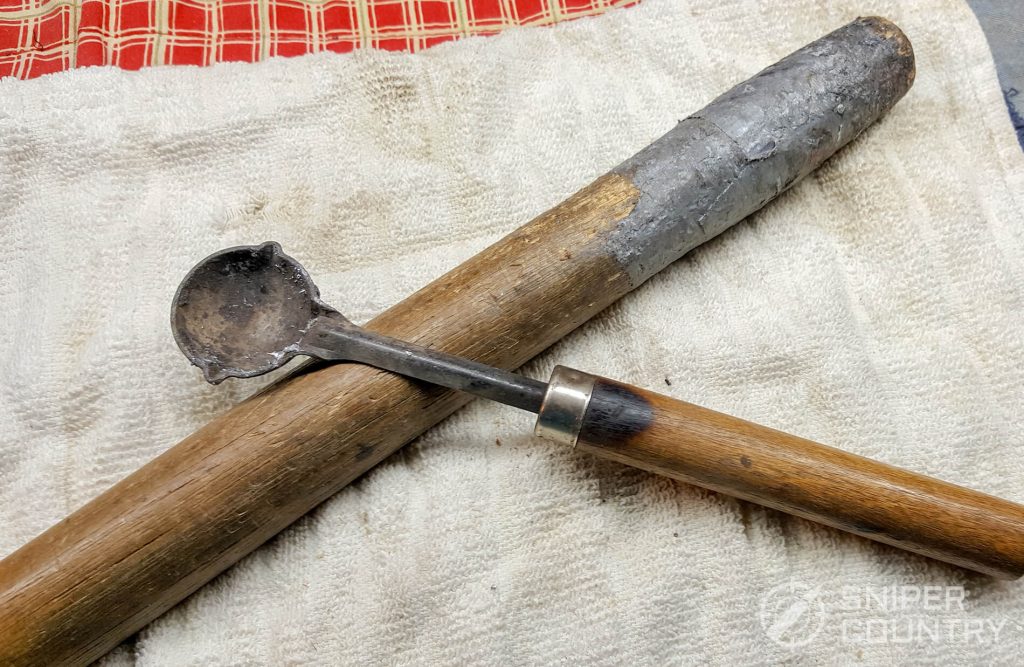
- Lead ladle
- A mallet of some sort to knock the mold’s sprue plate open (I use a piece of an old hickory handle)
- An ingot mold
- A bullet sizer, if needed (not pictured)
Let’s look at each of these.
Lead Furnace
There are several types of lead furnaces, or melters…there are smaller pots that you dip the molten lead out of with a ladle and there are larger ones with a handle you lift which allows lead to pour out of a bottom spout. There are others, but these are the two main types. Some casters will only use the ladle method – they feel they get a bit more precision that way – but I’ve used both types of furnaces with success. There are different brands out there – you can spend a little or a lot. Being a retired teacher, I’ve always been on the “little†side of that equation which means Lee equipment, which tends to cost less than some other brands such as RCBS, Lyman, Saeco…there are many different makers. For the most part, equipment from these other makers was above my pay grade, so to speak. They do build great-quality stuff, but I’ve found that Lee equipment works for me (as you can read in my reloading press guide). You just have to decide how much you want to spend. I use Lee reloading dies, I have a Lee turret press and powder measures, all the bullet molds shown are Lee, I own two Lee lead furnaces…the equipment works and is reasonably-priced. Here are photos of my (WELL-used) Lee furnaces…
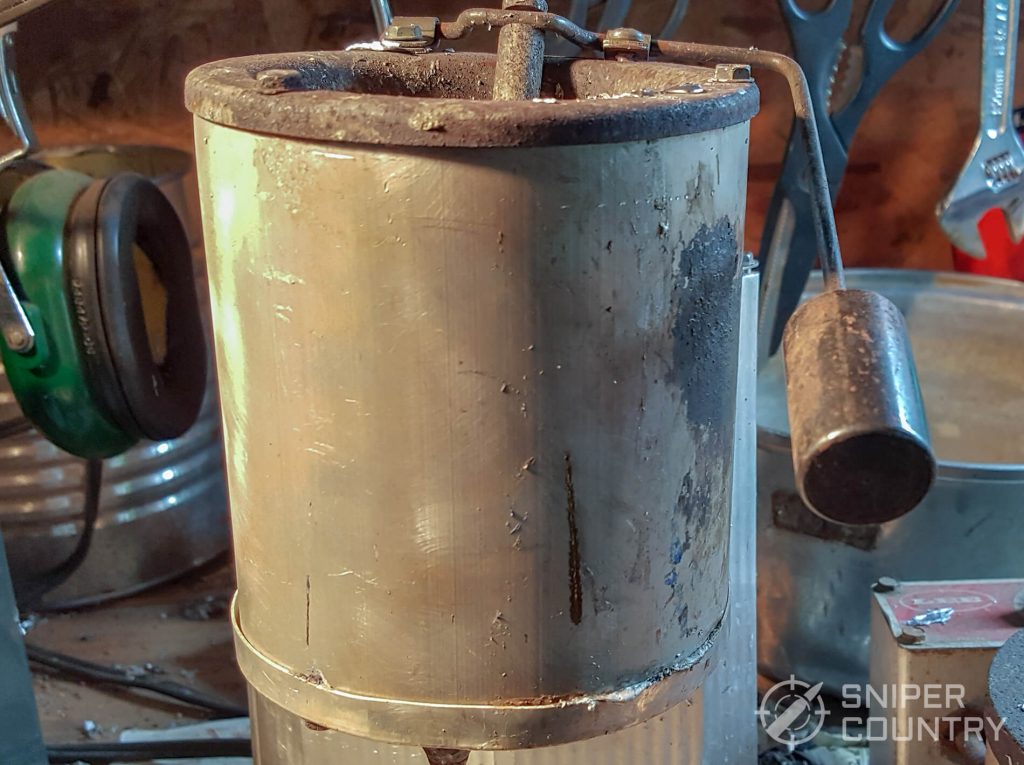
Lee also makes a 20-pound pot, as do most other makers, with some making pots that will hold more than that – production pots. Four and ten are the amount of lead, in pounds, that each pot can hold. Notice the lift handle – you simply lift it which raises the stopper from the bottom pour spout and allows lead to flow. The spout is barely visible at bottom. (Tip: if the lead flow slows down, take a large paper clip and bend an “L†on one end. Use it by inserting the L into the spout from the bottom and wiggle it around a bit. That should clear whatever is causing your slow-down. Just be careful – use the long “handle†of the paper clip to keep your hands away from the spout).
It helps, having two furnaces. I can keep all the crud from dirty wheel weights out of the bottom pour spout of the larger pot by melting them in the smaller pot. My new “high-volume†production plan: I plan on, once I have the good weights sorted from the bad, to take an old cast-iron skillet I have and set it on my turkey fryer heater base, connected to an LP tank. This will melt them quickly and allow me to skim the clips and dross from the weights and make many ingots at one pouring. Competitive shooter Jerry Miculek does this – it really speeds things up.
For now, I use the small pot to melt the clips off the weights.
Bullet Molds
The mold is the one piece of equipment that determines if you have a great bullet, or one that goes back into the pot. A properly-made mold will last many years and should produce thousands of bullets. Just keep the sprue plate and aligning pins lubed by touching some hard bullet lube or mold lube to the corner of the mold under the screw, and to the alignment pins. A little goes a long way, and do not get it into the mold cavity – dozens of wrinkled bullets will result.
My Personal Preference: Lee Aluminum Molds
A bit of digression here. This is not a commercial, and no, I’m not paid by Lee – I just like their stuff. Since all my bullet molds are made by Lee, I’ll talk about them since I am most familiar with them. Be aware that there are many other fine factory- and custom-made bullet molds out there. A quick Google search will reveal several dozen. I like Lee molds for a few reasons – they’re made of aluminum so they don’t rust, bullets tend to drop free with little effort, as well and they’re lighter to hold during a long pouring session, and Lee will repair or replace faulty molds. However, there are steel molds available from the major manufacturers mentioned elsewhere in this article that have been around longer than the Lee molds and throw excellent bullets. It’s your choice. Lee molds come with handles (except for the six-cavity models) which saves you a bit of money. I don’t know how many thousands of bullets I’ve cast over the last 40 years, but I do know that they all came from Lee molds.
Bullet Molds: Construction and Preparation
Bullet molds consist of three basic parts: the mold body halves, the handles and the sprue plate. The mold halves are machined from either steel or aluminum and have the “negative†cavity of whatever bullet you’re making machined into them. When put together and maintained well, the halves will make that bullet, many times over. The handles are self-explanatory, except that they are different for different-capacity molds. As mentioned above, Lee molds include handles except for the six-cavity molds – other brands usually sell all handles separately. A mold that throws two bullets will usually have shorter handles than one that throws six or so. Plus, the six-cavity mold will have a third handle attached to the sprue plate that, when pulled away from the mold, cuts the sprues. The smaller ones need the plate hit with something that won’t mar it – see my “whacker†below. What is a sprue? When the mold is closed, the sprue plate with its “sharpened†fill hole edges is moved over the top of the mold by using your mallet, into place. After it’s filled, wait a few seconds and then either pull the handle (six-cavity mold) or hit the sprue plate (smaller molds) to cut the sprues off the bullet bases. The sprue is simply where the molten lead enters the cavity at the bullet’s base. It, and the top of the mold, are machined perfectly flat so that when the plate is moved out of the way, the bullet base is flat.

Lee makes two basic types of bullet molds…regular-lube-groove and tumble-lube. What’s the difference? Let’s look at the molds…
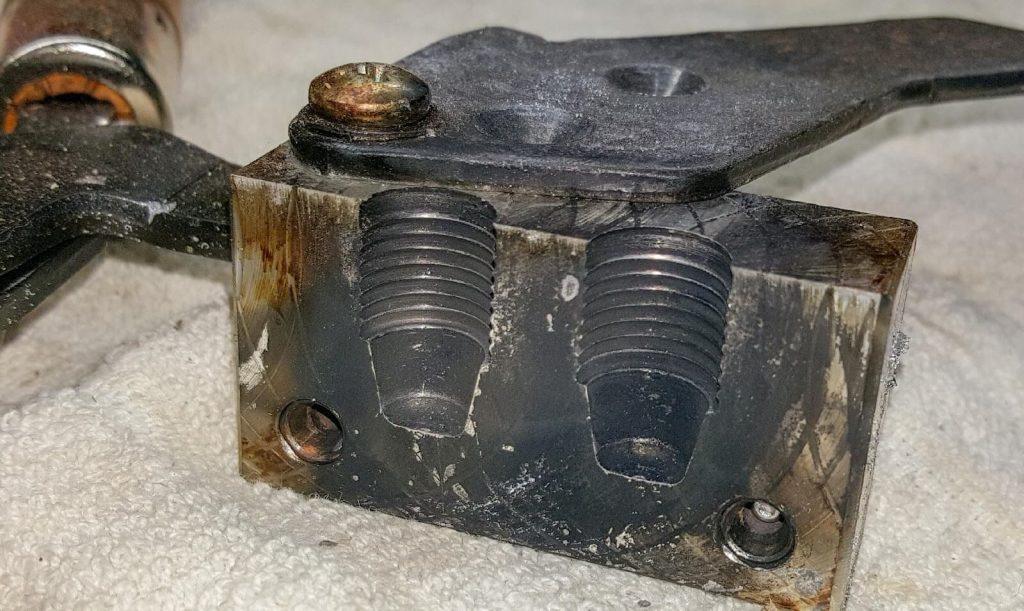
Here’s a conventional lube groove mold. Bullets dropped from this and similar molds were designed to be lubed by inserting them into a machine called a “lubrasizerâ€. The bullet would be squeezed down to the right diameter and a shot of stiff bullet lube would be inserted into the one lube groove. This may or may not prevent leading…that depended on several other factors. This was the traditional way of sizing and lubing bullets for decades. I had a Lyman 450 sizer/lubricator and used it until it just wore out. I mostly shoot tumble-lube bullets now, which obviates the need for an expensive lubrasizer.
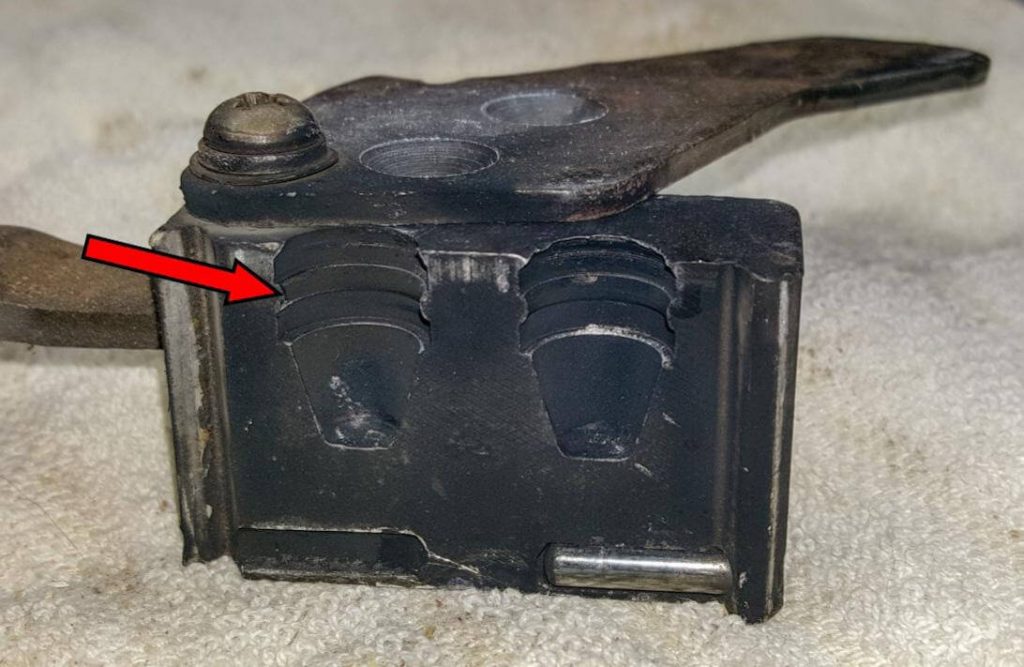
Notice the one large lube groove above – that’s the band that sticks out in the middle of the bullet. Remember, everything is backwards on the mold…what sticks out on the mold will be a groove on the bullet. This is the very popular .45 ACP 200-grain semi-wadcutter mold based on the famous H&G 68 mold. It shoots very accurately out of my Springfield XDM .45. This is an older-type mold from Lee – notice the “Lâ€-shaped alignment groove and protrusion on the left and right side of the mold. This is where you touch lube in order to keep the mold from sticking to itself and to release easily.
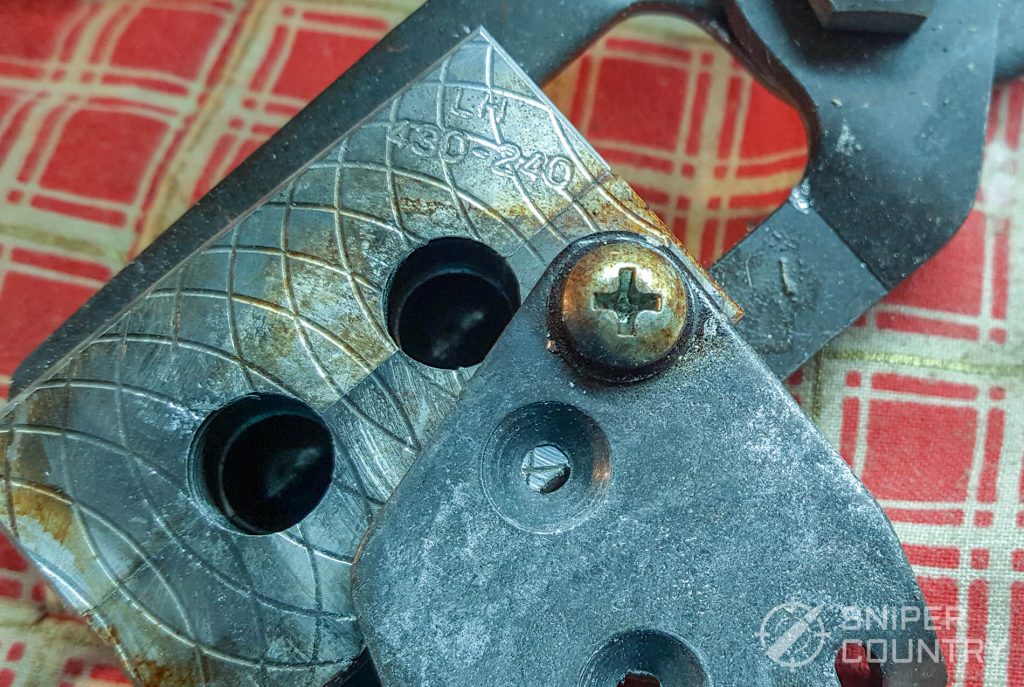
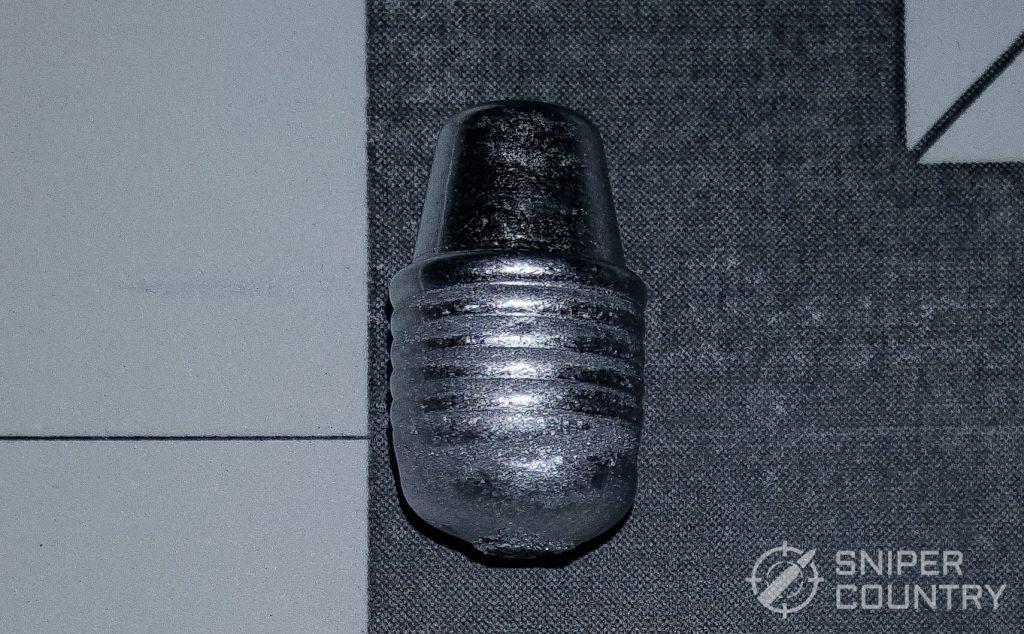
As mentioned above, here is the tumble-lube design bullet mold:
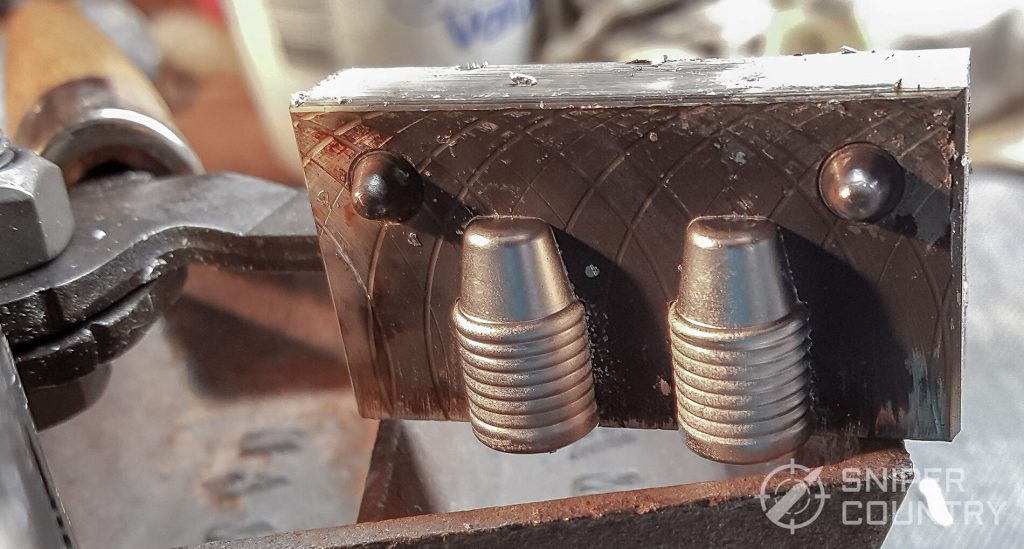
Notice that there are several bands instead of one main lube groove. There is a shoulder band (the first band behind the nose) and then the other lube “grooves.†In order to lubricate this type of bullet, a small amount of a liquid aluminum oxide (alox) solution is squeezed from a bottle into a container that has a lid you can close. I use an old cottage cheese carton. Put the bullets into the container, add a very small dab of alox and close the lid. It is at this point that you start playing tracks from your “Best Of The ‘80s Music Collection†– you must swish the container around and around, shake it, swish it around…it helps if you dance when you do it! The same process works for coating bullets with powdered paint. So, you get your exercise as you distribute the lube over all the bullets in the container. After a minute or so, pop the lid off and pour the bullets out onto a piece of waxed paper. Let them dry overnight then load them. This method, for me at least, is easier than the old way with the lubrasizer, or at least cheaper– I’ve done both. Getting stuck bullets out of the old Lyman 450 was…interesting…to say the least.
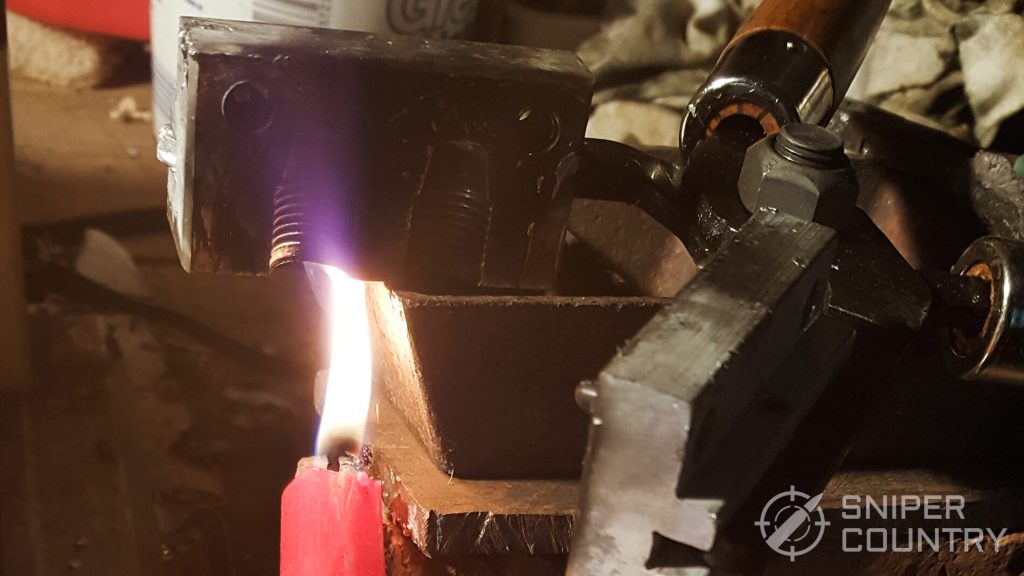
How To Get A Bullet Mold Ready To Cast Bullets
You can’t just take a mold out of its box and pour molten lead into it…there are a couple things you need to do to get it ready. You must first “smoke†the cavities. Notice how the bullet cavities in the mold photos are black? That’s carbon, deposited from a lit candle. Light a candle and hold it under the open mold cavities. Do NOT get wax into a mold – drip it over a waste basket or something. If you get wax in there, it will take many pourings to melt it out all the way. You will end up with dozens of wrinkled bullets until the wax is burned out. Just make sure you get the black layer well into all grooves in the mold. This will insure that the bullet will drop out when you open the mold. (If it doesn’t, tap the hinge of the mold with your mallet – not the mold itself).
The other area to be lubed are the locking pins. Just touch some hard bullet lube or similar substance to them, after the mold is hot. This allows the mold halves to separate easily.
What – No Sizing?
So, now we have a pile of shiny bullets. What about sizing? Lee has designed their tumble-lube bullets to not require sizing. The only Lee bullet that I bought a Lee push-through sizer for was for a 230-grain .45 ACP .452 tumble-lube bullet that my son’s 1911 wouldn’t load consistently unless it was sized. I’ve loaded thousands of tumble lube bullets, unsized, with good results. Add to that the conventional-lube bullets that went through my guns that never saw a bullet sizer. Sizing can be important, depending on the gun, bore diameter and bullet. I’ve been lucky that most of my guns shoot well with as-cast bullets. Just don’t overdo it. It is easy to oversize a bullet and take it down too far. They do tend to hop, skip and jump down the bore and not seal the bore (obturate) very well-that can cause leading headaches.
Another way of lubing bullets (or, more correctly, doing something to them so they don’t require typical lubing) is to powder-coat them. I wrote an article on that subject – you can read it here. It really does do away with the need for lubing the bullet.
Ladle and Mallet
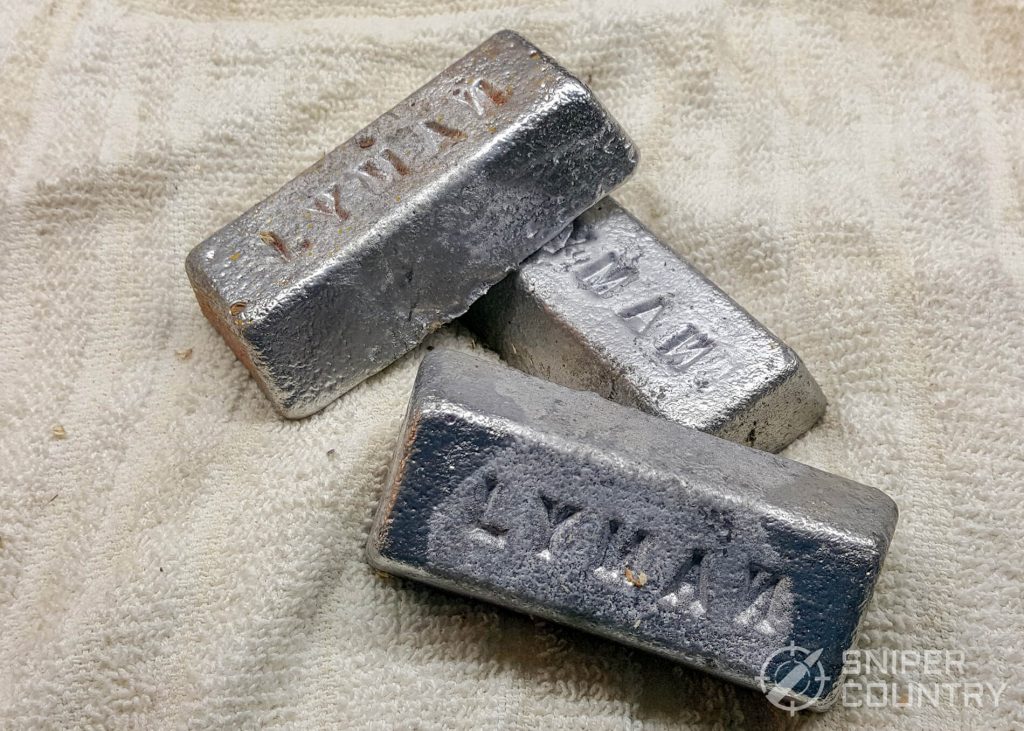
Ingot Mold
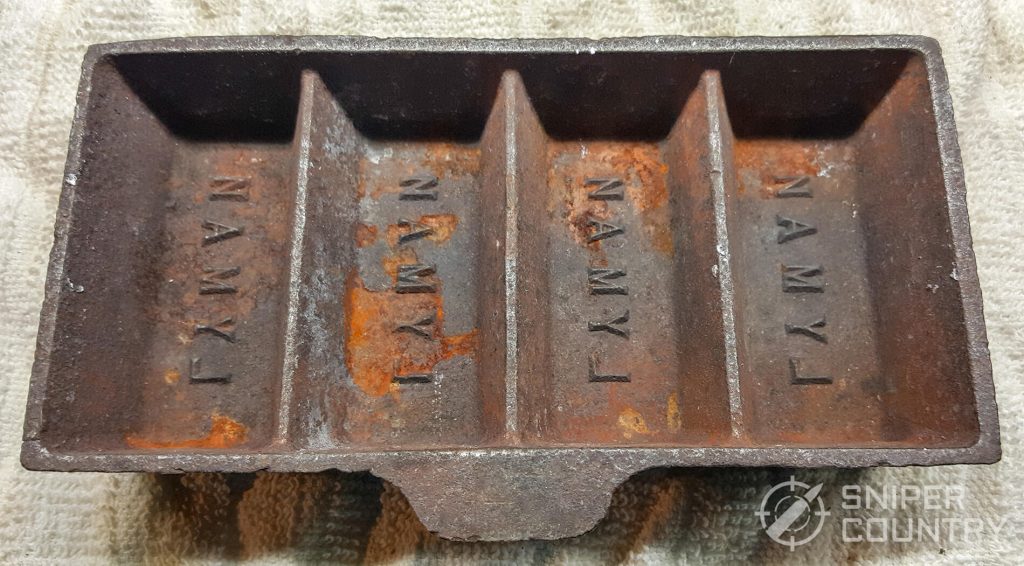
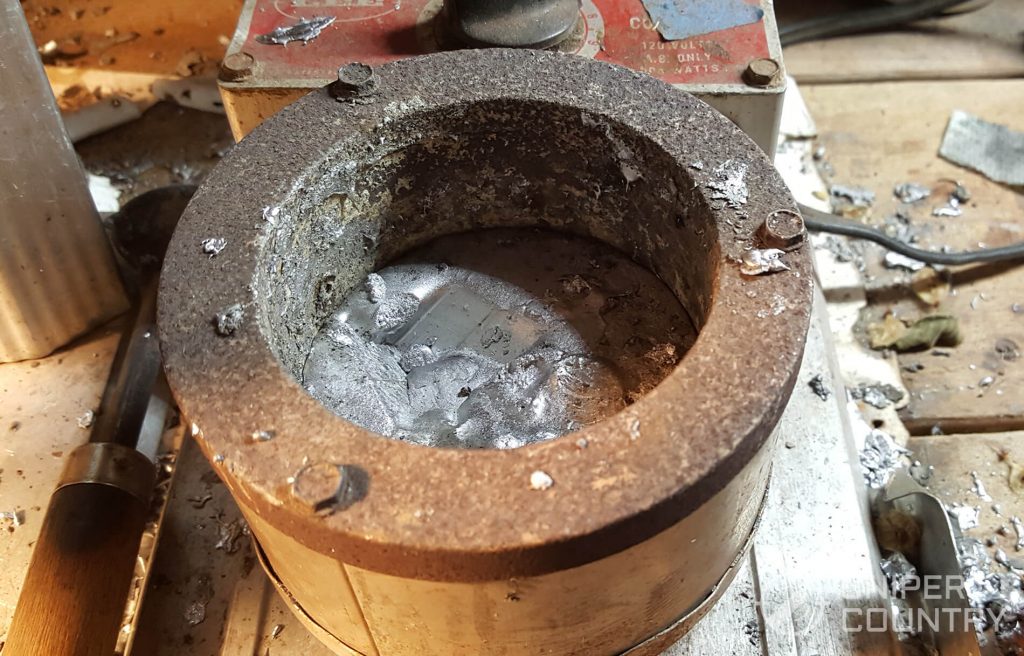
Now let’s look at a pot full of metal and see the difference between “dirty†alloy and clean.
Getting Ready – Melting The Lead
Place two or three ingots into your lead furnace, however many will fit in there. Turn the temp dial up all the way until the lead starts to melt. Bring the temp back to about halfway or so – you don’t need to leave the temperature at full-hot to cast most bullets, plus it helps your furnace heating element last longer. I’ve replaced one of those – it’s not fun. After you cast a few bullets, you’ll learn what temp works best with what mold. Big-bullet molds heat up quicker and hold the heat which means you’ll want to back off the temp a control bit. Small bullets, like the .380 ones I cast, require the pot to be kept hotter as they are small and let the mold cool off quickly. You’ll figure out what temperature setting keeps the alloy at optimal temperature for each mold.
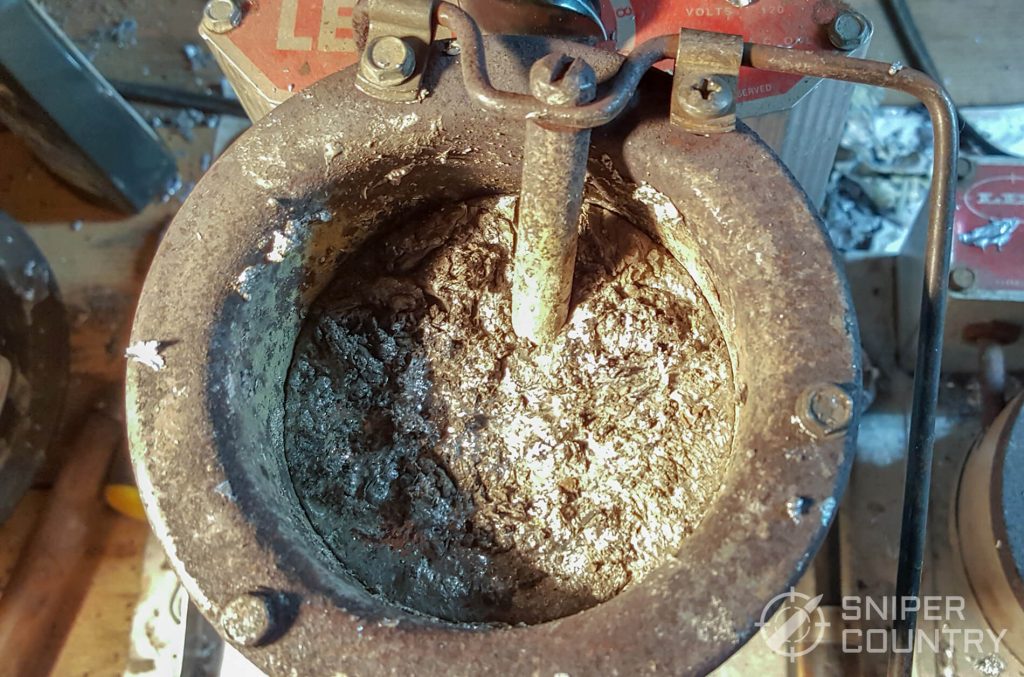
After the alloy has melted, stir it around and scrape the bottom and sides. Look in the pot. You will most likely see something like this photo below. This needs skimmed…see all the crud floating on top? This is the debris by-product from melting your alloy.
After stirring and scraping the sides and bottom, just skim it off and put it in your scrap bucket. It should look like this after you’re done:
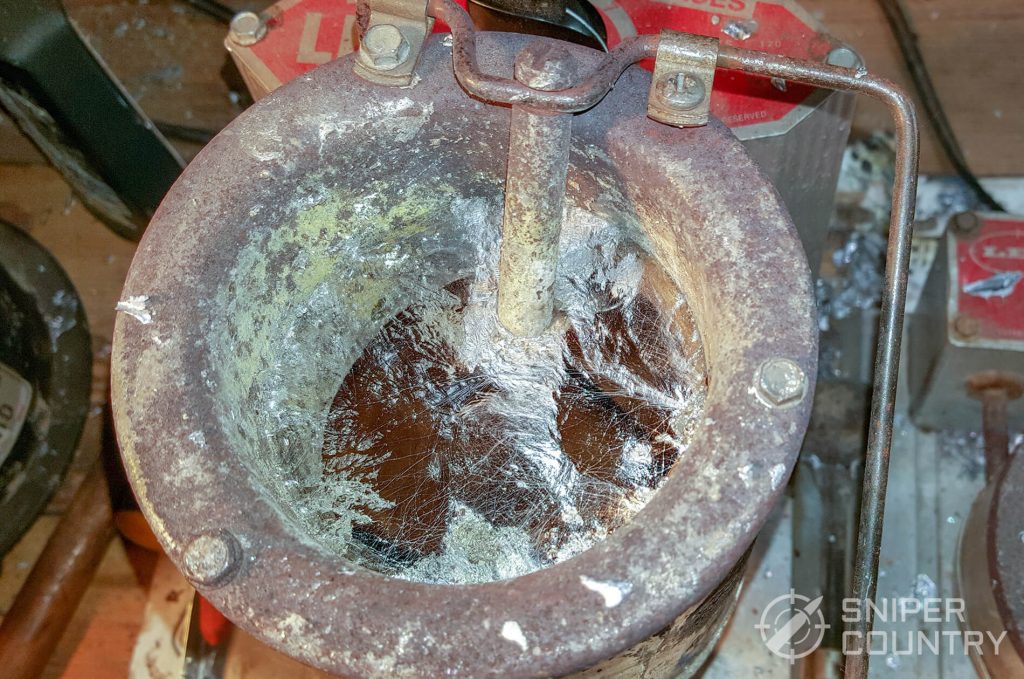
The “shiny†is hard to see in the photo but the surface has been cleaned of all the crud that came to the top after stirring.
To Flux Or Not to Flux?
When you have a new pot of alloy like that above, you have a choice of fluxing it or not. Fluxing is simply adding something to the mix that will burn off, creating smoke and possibly producing a flame on the top of the alloy. It has two purposes: to combine the metal(s) in the pot into one homogeneous mass and to remove impurities. When I flux, I take a small piece of candle wax or paraffin and drop it onto the surface of the molten alloy, stir it around a bit, stand back and wait for the â€flash†as it catches on fire and flames come up from the alloy’s surface. Sometimes it produces flame, sometimes not. When it’s all burned off, stir again and start your pour. You will need clearance, obviously, above your furnace – at least two feet. After many years of doing this, I have largely given it up as an unnecessary process for the bullets I cast. I have no problem filling out bullet molds with my home-blended wheel weight alloy, so this is one smoky step I skip most of the time. I will do it if I feel that the metals aren’t blending properly. Try it and if you think your fluxed-alloy bullets are better, by all means go for it. I just don’t do it as often as I used to. You will definitely want to flux your alloy if you’ve added any additional metals into it.
Temperature
Your alloy should be at a temperature that allows it to flow into all the grooves of your bullet mold yet not be too hot. There are thermometers you can get that will allow you to keep your alloy at a certain temperature. I can tell, from experience, when the alloy is either not hot enough or too hot by how it fills the bullet mold. An alloy that’s not up to temperature will not fill the mold out and will produce wrinkled or mal-formed bullets. The under-temperature alloy may not even make it past the sprue plate. On the other hand, I’ve had alloy so hot that it just would not “set up†in the mold and I could pour it back into the pot. Too hot. WAY too hot. If your bullets come out frosted, not shiny, your alloy is still too hot. Let the mold sit a while and cool down, dip the corner of the mold into water (aluminum molds only) or move the temp dial on your furnace back a number or two. Your bullets should be shiny with no frost and drop free of the mold easily. Some guys have duplicate molds, especially for larger bullets that tend to hold the heat in the mold. They’ll cast several bullets with the first mold, then switch to the other one as the first one cools down. However you do it, you’ll know if your mold is too hot or not hot enough with experience.
OK. We now have gotten our alloy ready to use and have prepared our bullet mold(s) by heating, lubing and smoking them. Let’s make some bullets!
The Process
The bullet casting procedure is pretty simple, really…you just melt lead until it flows like water, dump it into a mold and pop out a bullet. Well, sort of…but that’s the main idea.
First, start your lead melting in whatever furnace you have. I assume you’ve already made ingots from your lead source like we talked about above and it’s clean and ready to go.
I also assume you’re in a well-ventilated area (my garage door is open with two fans going) and are wearing safety glasses, gloves, long pants, shoes (NO flip-flops!) and an apron of some sort – lead can get nasty. This leads to…
Special Offer: Join our private community and get exclusive gun deals, handpicked gear recommendations and updates on law changes, every day!
Join our private community
A Caution – Safety First!
As you are waiting, you must get your bullet mold ready as well. This means making sure that it is clean and has NO oil or water or other liquid on it. The reaction that is created when water is introduced into molten lead is truly spectacular and is not for the faint of heart. You can get badly burned by the lead exploding out of the pot. Once lead is on your skin, it sticks there and continues to burn. A spot the size of a 10-penny nail head will hurt out of all proportion to its size. It won’t come off until you knock it off. Ask me how I know. So, everything is dry and you’re covered up…we’ll continue.
Second, preheat your bullet mold by sticking a corner of it into the melted lead, like this:

Third. After the mold is preheated, start your pour. Whether you use a ladle or a bottom-pour furnace, you’ll want to leave a little extra on top of the sprue plate because as lead cools, it shrinks and the bullet bases won’t be filled out like they should be if too little lead is poured. Here’s what it should, and should not, look like…
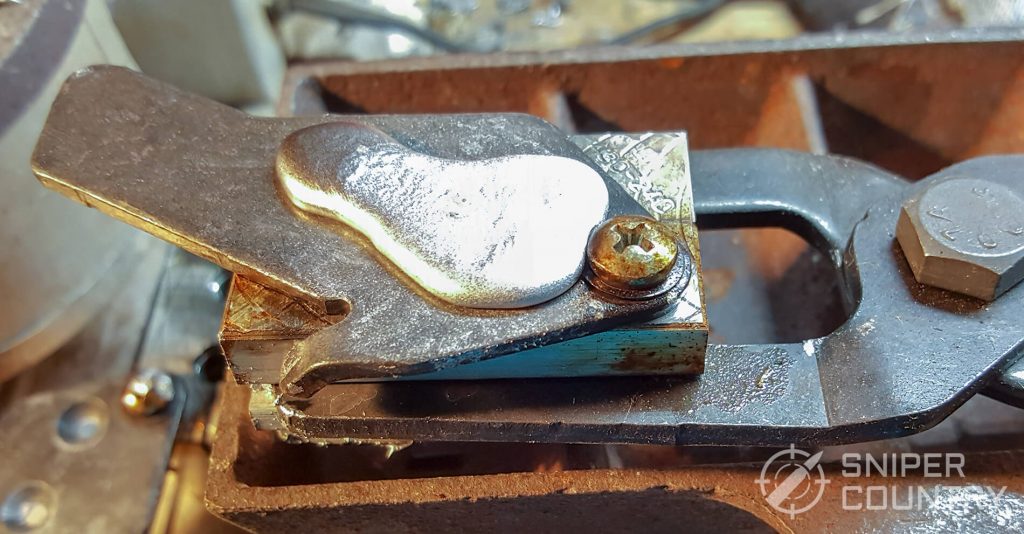
Should look like this above
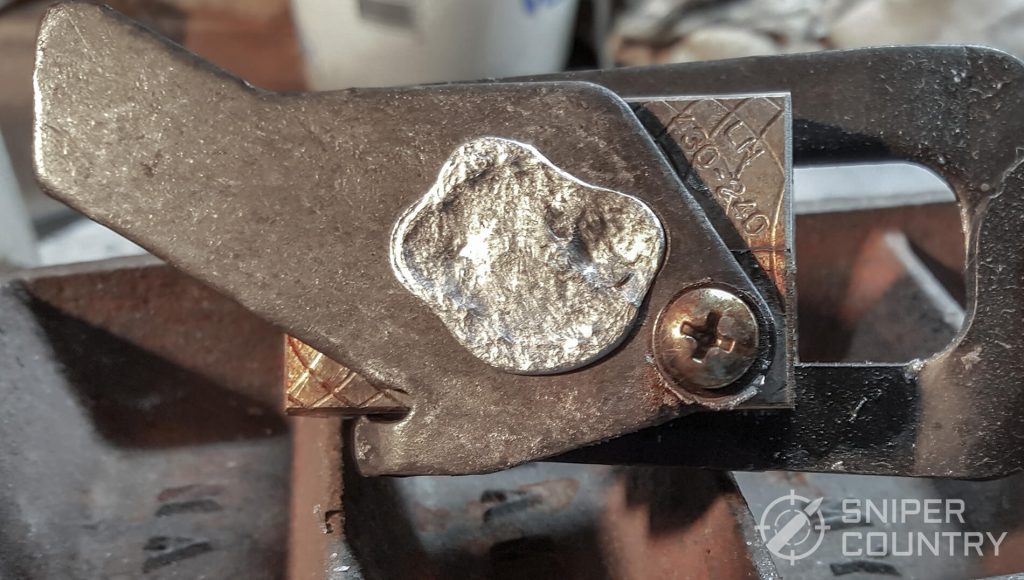
Should not look like this – notice “dimples†in the sprue puddle. Not enough lead to totally fill out bullet bases, which leads to this:
Bullet bases not filled out. Here’s what they look like out of the mold:
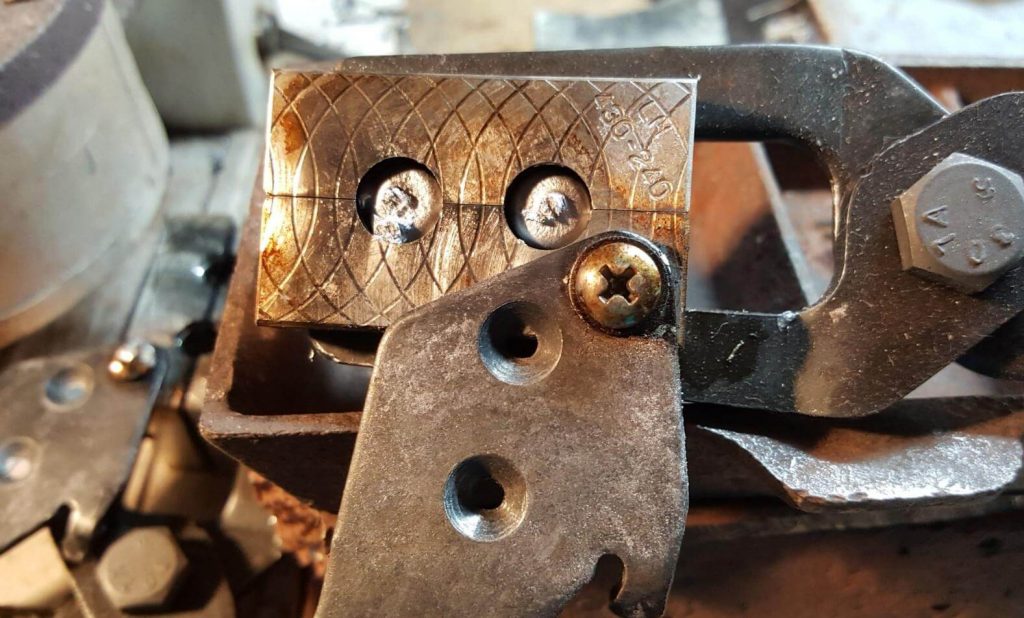
Here’s what you want to see (left bullet):

Here’s a good bullet:
It’s important to note that just because a bullet may have a little defect or wrinkle on its nose, it will still perform out to 25 yards or so. If you are looking for a good hunting bullet at 100 yards, pass it up but for practice it should be fine.
You should also have something to catch the overflow or drips from your bottom-pour spout – I use a spoon then put it back into the pot.

Fourth. Once you’ve got the mold full, give it a second until it “frosts over†– then whack the sprue plate or pull the 6-cavity handle and cut the sprues. Open the mold and if the bullets are good, drop then onto a soft towel or into water. If not usable, they eventually go back into the pot, as do the sprue puddles.
Fifth. Let them cool and either lube or powder-coat them. If you feel the need to size them, do that now. Lee makes an inexpensive push-through sizer for many different bullet diameters or you can use one of the lubrasizers like the Lyman I mentioned above.
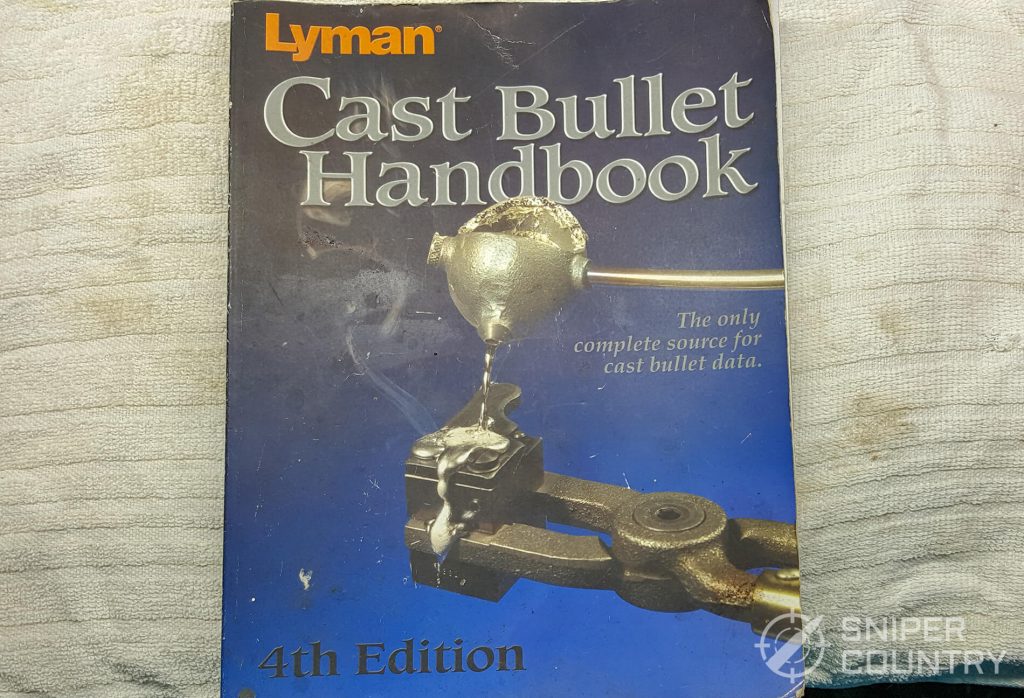
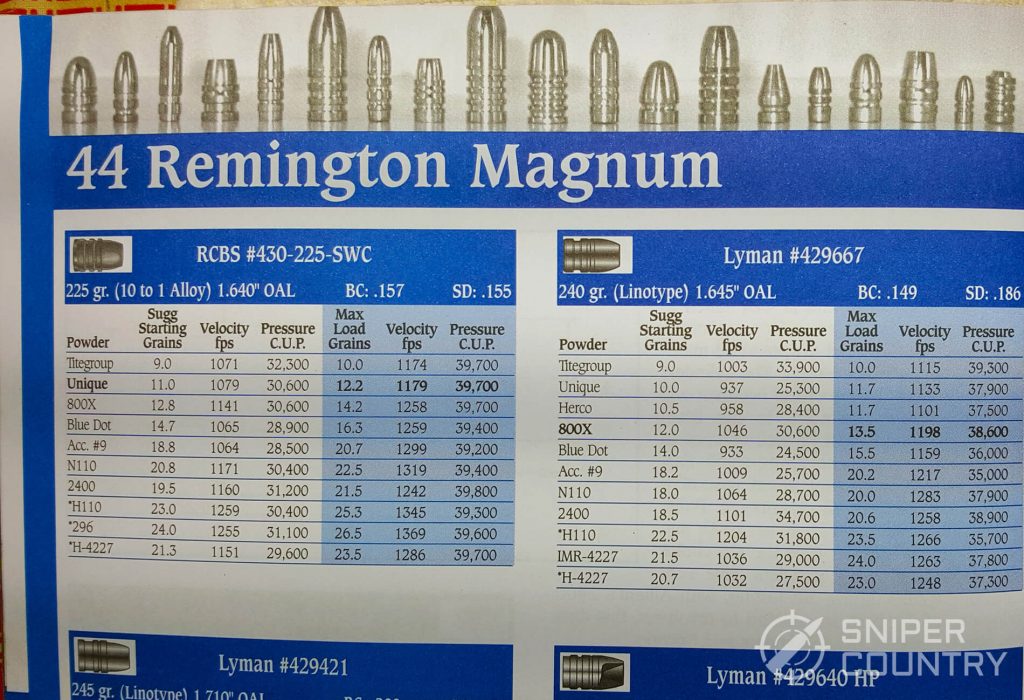
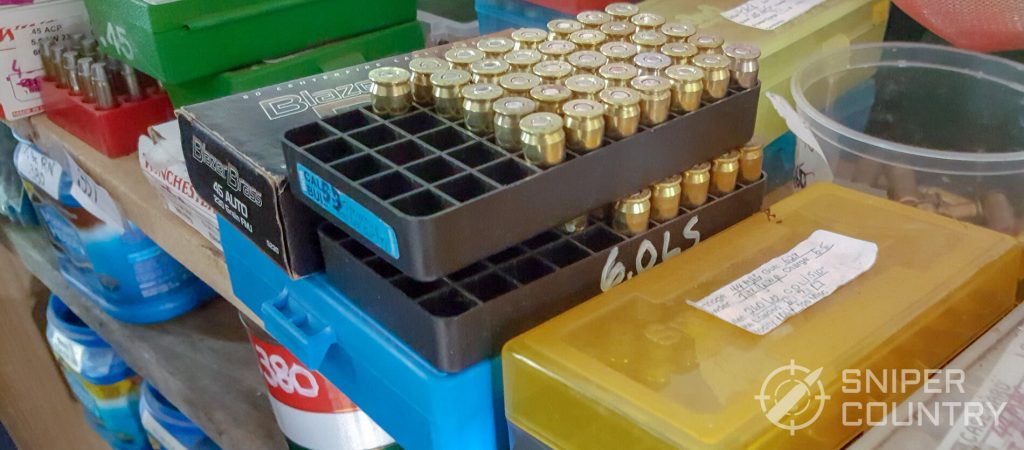
You’re done – now load them! Here’s a great reference for that…
Once you get the right bullet, you may end up with something like this…
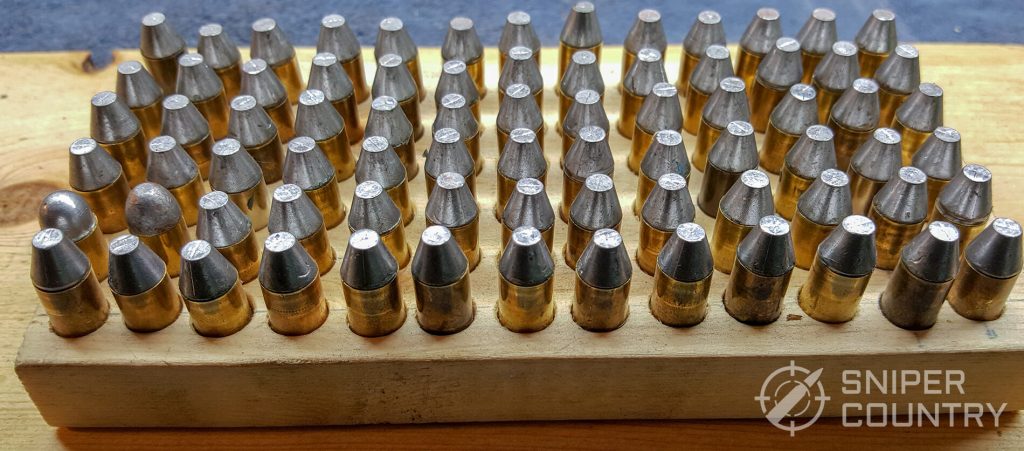
…or this…
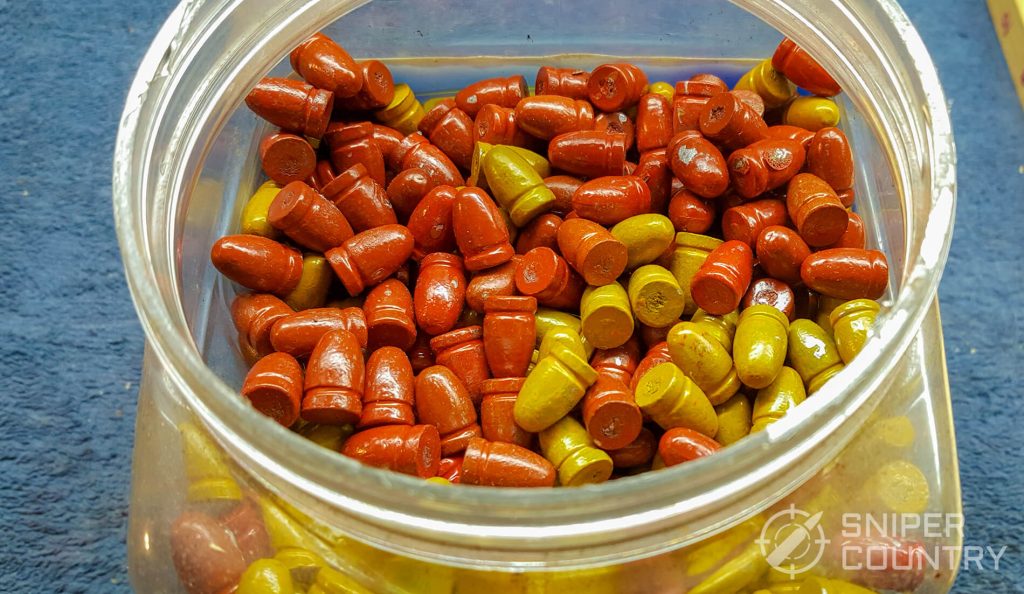
Or even this…
Conclusion
I could bore you with photo after photo of all my cast bullets, in filled plastic coffee containers neatly lined up in rows on my shelves, but that’s OK. You get the point – if you want to shoot more, you need to get into casting your own bullets. From experimental one-offs to making a thousand of one type for competition practice, you can do it. With free or inexpensive wheel weights (or even if you have to buy alloy), you are free to indulge whatever shooting whims you may have.
Just do it safely – proper ventilation and protective gear – and be careful. Once “bitten†by lead, you don’t easily forget it. But… play it safe and you will be starting on a hobby that not only piggybacks off your love of shooting but aids in keeping shooting costs down. Once a bullet caster, then next a reloader if you already aren’t. Read my guide on how to reload here.
So, give it a try. You may know someone who is a bullet caster and who will help you get started. If not, there are many YouTube videos on the topic. Making your own bullets cuts your shooting costs dramatically. I got into casting out of necessity and I’ve never regretted doing it. I’ve shot SO much more since I made my own bullets (and cartridges) than if I had to shoot just factory bullets. If you’re a handgunner especially, you really need to check it out.
Please leave questions or comments below. Stay safe!


complimenti veramente molto buono very good
ciao distinti saluti
very good
Valerio, thanks for the kind words!
A very well thought out and written article. as usual from this gentleman. Sounds like we both got started about the same time with the same revolver and caliber. My SBH has digested thousands of cast bullets of various weights and designs. in 44 magnum and 44 special. It makes shooting more affordable and a great hobby. I still personally think that if had not been for LEE Precision literally millions of people would not have gotten in to reloading and bullet casting. Lee made it a lot more affordable and still does. I have several LEE bullet moulds myself. Some of them are over 30 years old but still work great ! Even my Lee drioomatic lead pot still functions after all these years. I also have other manufacturers moulds such as RCBS ,.Lyman, NOE,LBT etc. , I always figured if I can not reload and cast bullets for it why have it. I have taught both my sons and 2 son in-laws to reload and cast bullets along with several other friends. Yes I also powder coat everything. Once you get the hang of it powder coating is the way to go in my opinion. My Saeco lube sizer now sits in the corner. I usually run my new loads over a chronograph to verify everything including how well the powder coat is holding up. You will find it rather surprising how well it works. My daughter informed me that some of them are almost to pretty to shoot.
Stephen, sounds like we have a lot in common. I couldn’t shoot as often as I do if I didn’t reload, and make my own bullets. Thanks for passing it on to your sons and in-laws, and thanks for writing!
Thank you for all of your knowledge and that you share it with us
Rickey, thanks. I’m just trying to pass on what I’ve learned over all these years. Thanks for writing!
Thanks Mike;
This is very helpful, especially all the pictures.
I especially like you picture of 24 different molds (and I bet you have more than failed to make it to the picture!).
Lee molds are so inexpensive, that you can afford to try out a variety of bullet styles and weights. And that is part of the fun.
DEH
David, you;’re right about the Lee molds – I’ve never used anything else since these work so well. They do have a few quirks but all in all work very well. And, I did have some that didn’t make the photo cut… 🙂
Thanks for writing!
Thanks for the excellent tutorial on bullet making..
William, appreciate your comment. I hope you can give it a try soon – you’ll get hooked!
Mike sounds very knowledgeable in all aspects of casting thanks
Raymond, I appreciate your comment. It is a fun hobby. Thanks for writing!
Hello. I’m new to casting and I have heard different methods of cooling. Do you suggest air cooling, water, or even oil cooling? I am also investigating powder coating my .410 and 12 Ga foster slugs. Any advice would be welcomed.
Respectfully,
Dwayne