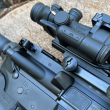
This article offers advice on using a camera tripod to support your rifle whether you’re a sharpshooter or a sniper. A tripod has a lot of benefits over using cross sticks or a folding bipod. And, when it’s sufficiently camouflaged with an adapter that fits the forearm of the rifle, you’ll be hard-pressed to find something else that works better.
A tripod lets you quickly make varying height adjustments to compensate for terrain gradients, and all three props offer solid support in a fixed position and when marking a moving target. When placing the tripod on the ground horizontally, the adapter provides better stability than a Harris BR-5 series rest. It’s used similarly to that of the British “Hawkins” position which rests the stock toe on the ground and uses the support fist on which to rest the forearm of the rifle.
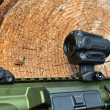
In this article, we will refer to the camera tripod fitted with an adapter bracket for the rifle’s forearm as a Sniper Saddle.
Tripods vary in price and quality but whichever brand you get, the most important factor is that it’s sturdy and does not wobble when you use it. The brand of tripod isn’t critical but if you don’t have any budget restrictions, you can comfortably go for the top of the range brands, like the Bogen. However, what you’re really looking for is a tripod that’s solid, compact, that you easily and quickly pack up and transport.
Sniper Saddle ready for a Drag Bag
The original Sniper Saddle 1 was made with a 4-inch wide, 1 and a quarter deep aluminum ‘U’ channel cut to a length of 2 inches. After smoothing out the edges, an ‘X’ was lightly etched along the base and a number 30 drill bit was used to make a pilot hole. This hole was tapped with a standard quarter inch-20 thread because, for photographic equipment, this thread pitch is a universal standard.
A quarter-20 stainless steel knurled thumb nuts secured the tripod and Sniper Saddle components together. The reason for the 2-inch length was for bulk reduction and portability in the field. The second generation, Sniper Saddle 2 was cut to a 4-inch by 4-inch square to create a bigger surface area for the forearm.
BONUS OFFER: Get your free shooting range targets to print at home!
Get your free targets to print at home!
Sniper Saddle Rear Oblique View
First off, cut the length of the aluminum channel and smooth the edges. Using sandpaper, lightly scuff the surface interior to create an adhesive bond. If any clear coat finish was applied, it will also break through this.
You can use any neoprene foam rubber scraps for liner and the sheet is about 48-inches wide by 72-inches long. Cut the rubber is cut into 5-inch by 7-inch pieces and pre-fit them to the channel. Thick 3/8 inch GI sleeping mat pads can be used in place of the neoprene foam.
Take a tube of Permatex #80B Super Weatherstrip Adhesive to coat the channel’s interior surface in its entirety and then carefully press the piece of 3/8-inch thick closed cell neoprene rubber into place. In later models, an industrial grade of Contact Cement was used for better economy. Let the cement dry for 15-20 minutes then take the foam and press it into place.
Cut a wood block into pieces that are 2 x 3-quarter inch long by 3-inches wide and 1-inch thickness and c-clamp them to hold the rubber liner in position until the adhesive is fully dry, which normally takes about 24 hours.
Use a very sharp knife to trim any neoprene excess. Start with the vertical ends and cut from the base to the top and then away the center top with two center to end cuts. It is easier to trim more evenly if you freeze the Sniper Saddle first. Once it’s back to room temperature, coat the exposed neoprene with black Tandy Leather “Edge Dressing” to seal the open cells.
After it has dried, use masking tape to cover the foam and give it two coats of black or olive drab enamel paint. You may also want to use some type of Cordura cover on the neoprene to avoid degradation.
The third generation Sniper Saddle used a piece of 4-inch black PVC pipe coupling cut in half lengthwise. You can use a Moto-Tool to grind out the center coupling’s annular ring to roughen up the interior so the adhesive can bind the components together.
Using PVC for the Sniper Saddle on a tripod
PVC is a soft plastic, so you want to prevent the threads from stripping out from the plastic when you secure the saddle to the tripod. To resolve this, get some T-nut inserts from the local hardware store.
To fix the T-nut in a wood object, hammer the spikes flat in a jig that’s made from bar stock. Bore a 5/16-inch diameter hole in the center of the PVC casing and modify the T-nut flange glued from the inside using a gob of J-B Weld. Carefully smear the epoxy around it and then leave it out to dry.
After it has hardened, the J-B epoxy and the slightly protruded T-nut must be feathered down so it is level with the body. It’s recommended to use a Moto-tool to prevent any bumps showing up through the foam. Draw file the tip evenly with the outside edge of the coupler.
Then, glue a piece of 3/8-inch neoprene foam to the housing interior using contact cement. Let it dry and then trim it down with a sharp knife and then carefully round off the edges using a combination Belt/Disc sander. Once that’s all done, give the whole thing a few coats of primer and olive drab camouflage paint that you can find at any paint or hardware store.
The final touch would be adding camo to your new Sniper Saddle with whatever style you prefer, which could be Burlap or fake-rock paint. And that’s it, you’re all done. Now, you can take your Sniper Saddle out into the field and practice, practice, practice.